How-To Prime the Filters
Simple and straightforward instructions for setting up the BOROUX foundation.™ filters. We'll lead you through the process one step at a time. Set up and start enjoying your filtered water!
What You Need
- Mixing spoon
- 1/8 teaspoon
- Glasses or jars
- Pitcher
- Water
Included in the Box
- Quick Start Guide instructions
- Two Boroux foundation filters
- One blue priming tool
- One tan priming tool
- One vial of red dye
How to prime the filters using the blue priming tool
Priming means to fully saturate the interior and exterior of the filters with water. This process activates the carbon, which is key to trapping unwanted contaminants. The filters must be primed before use, and after cleaning.
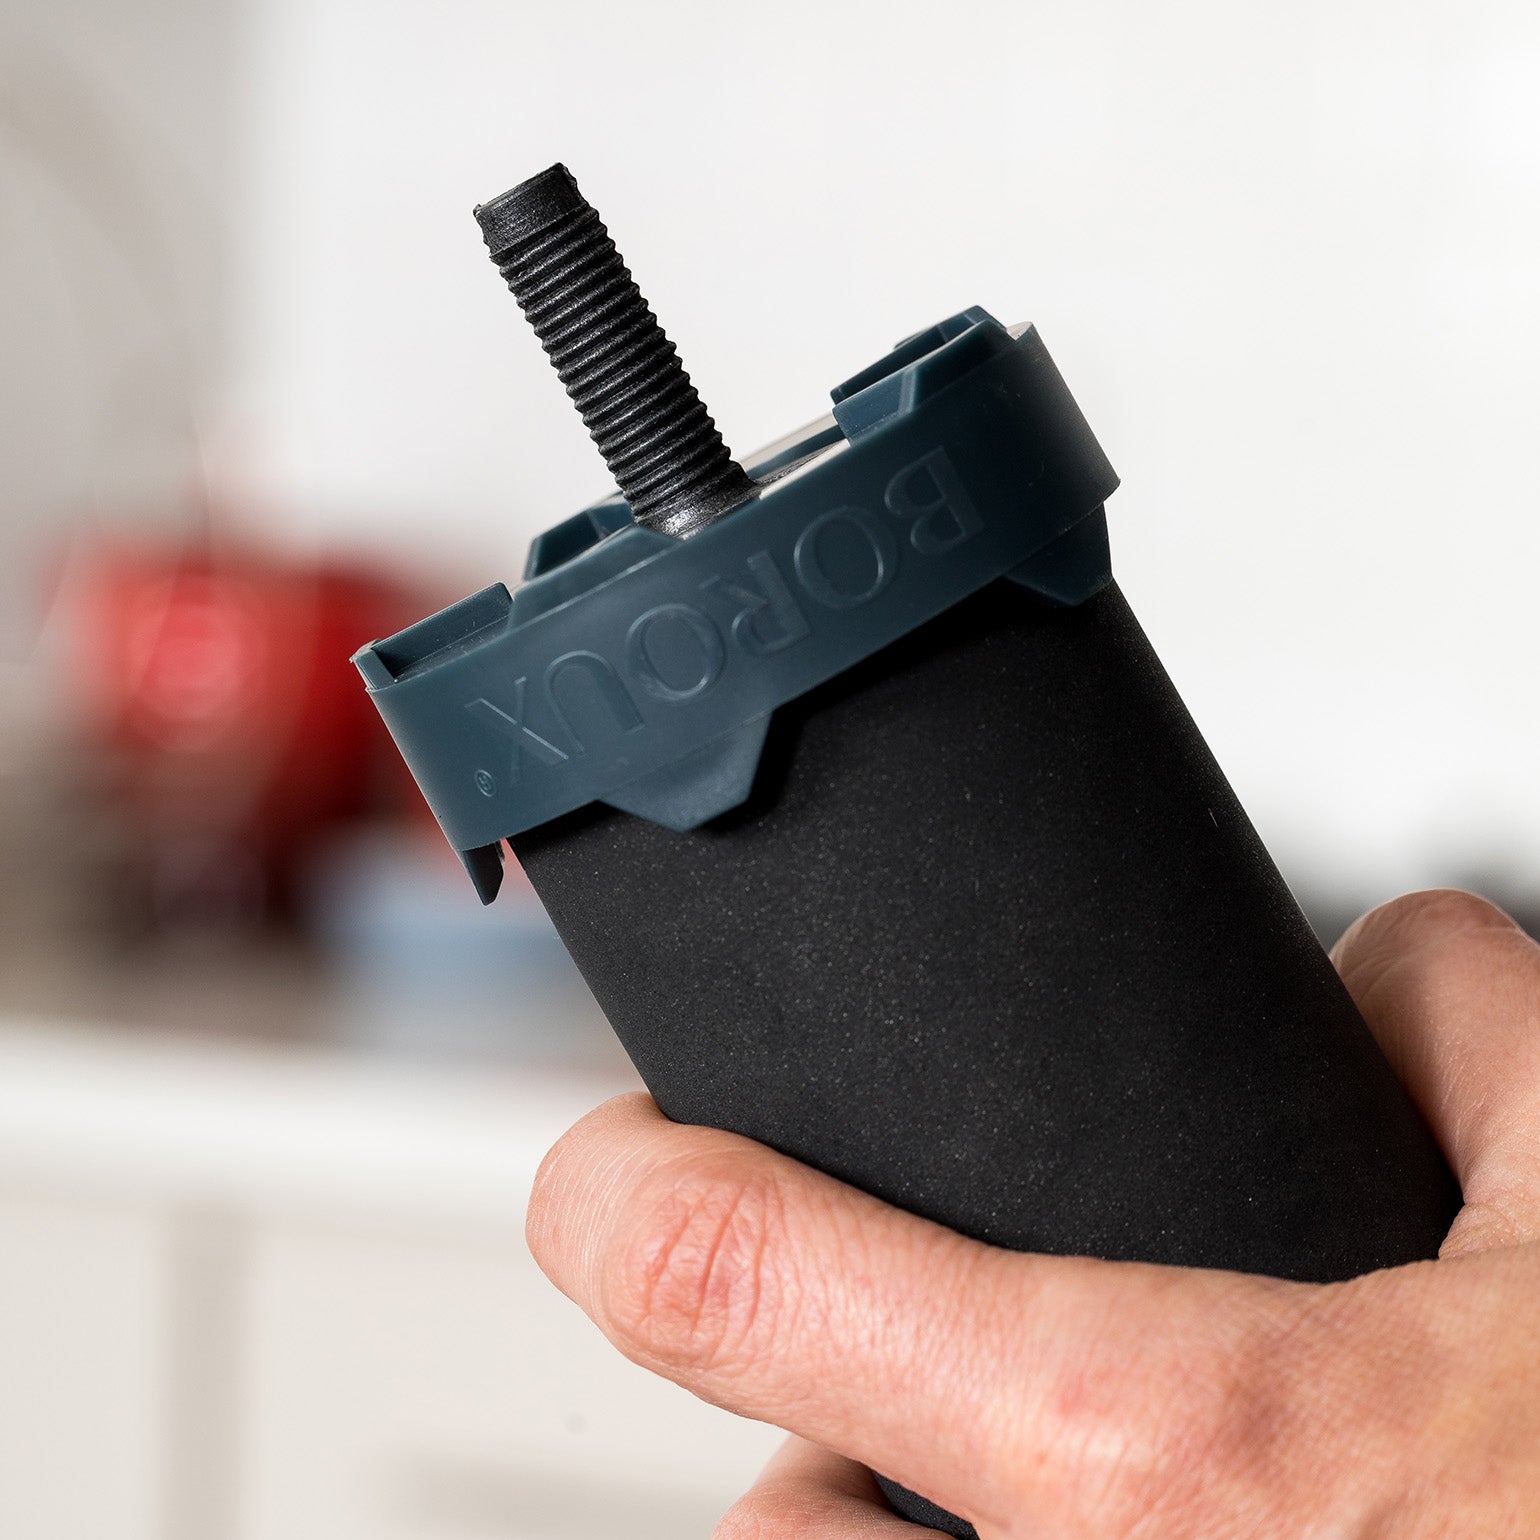
Step 1
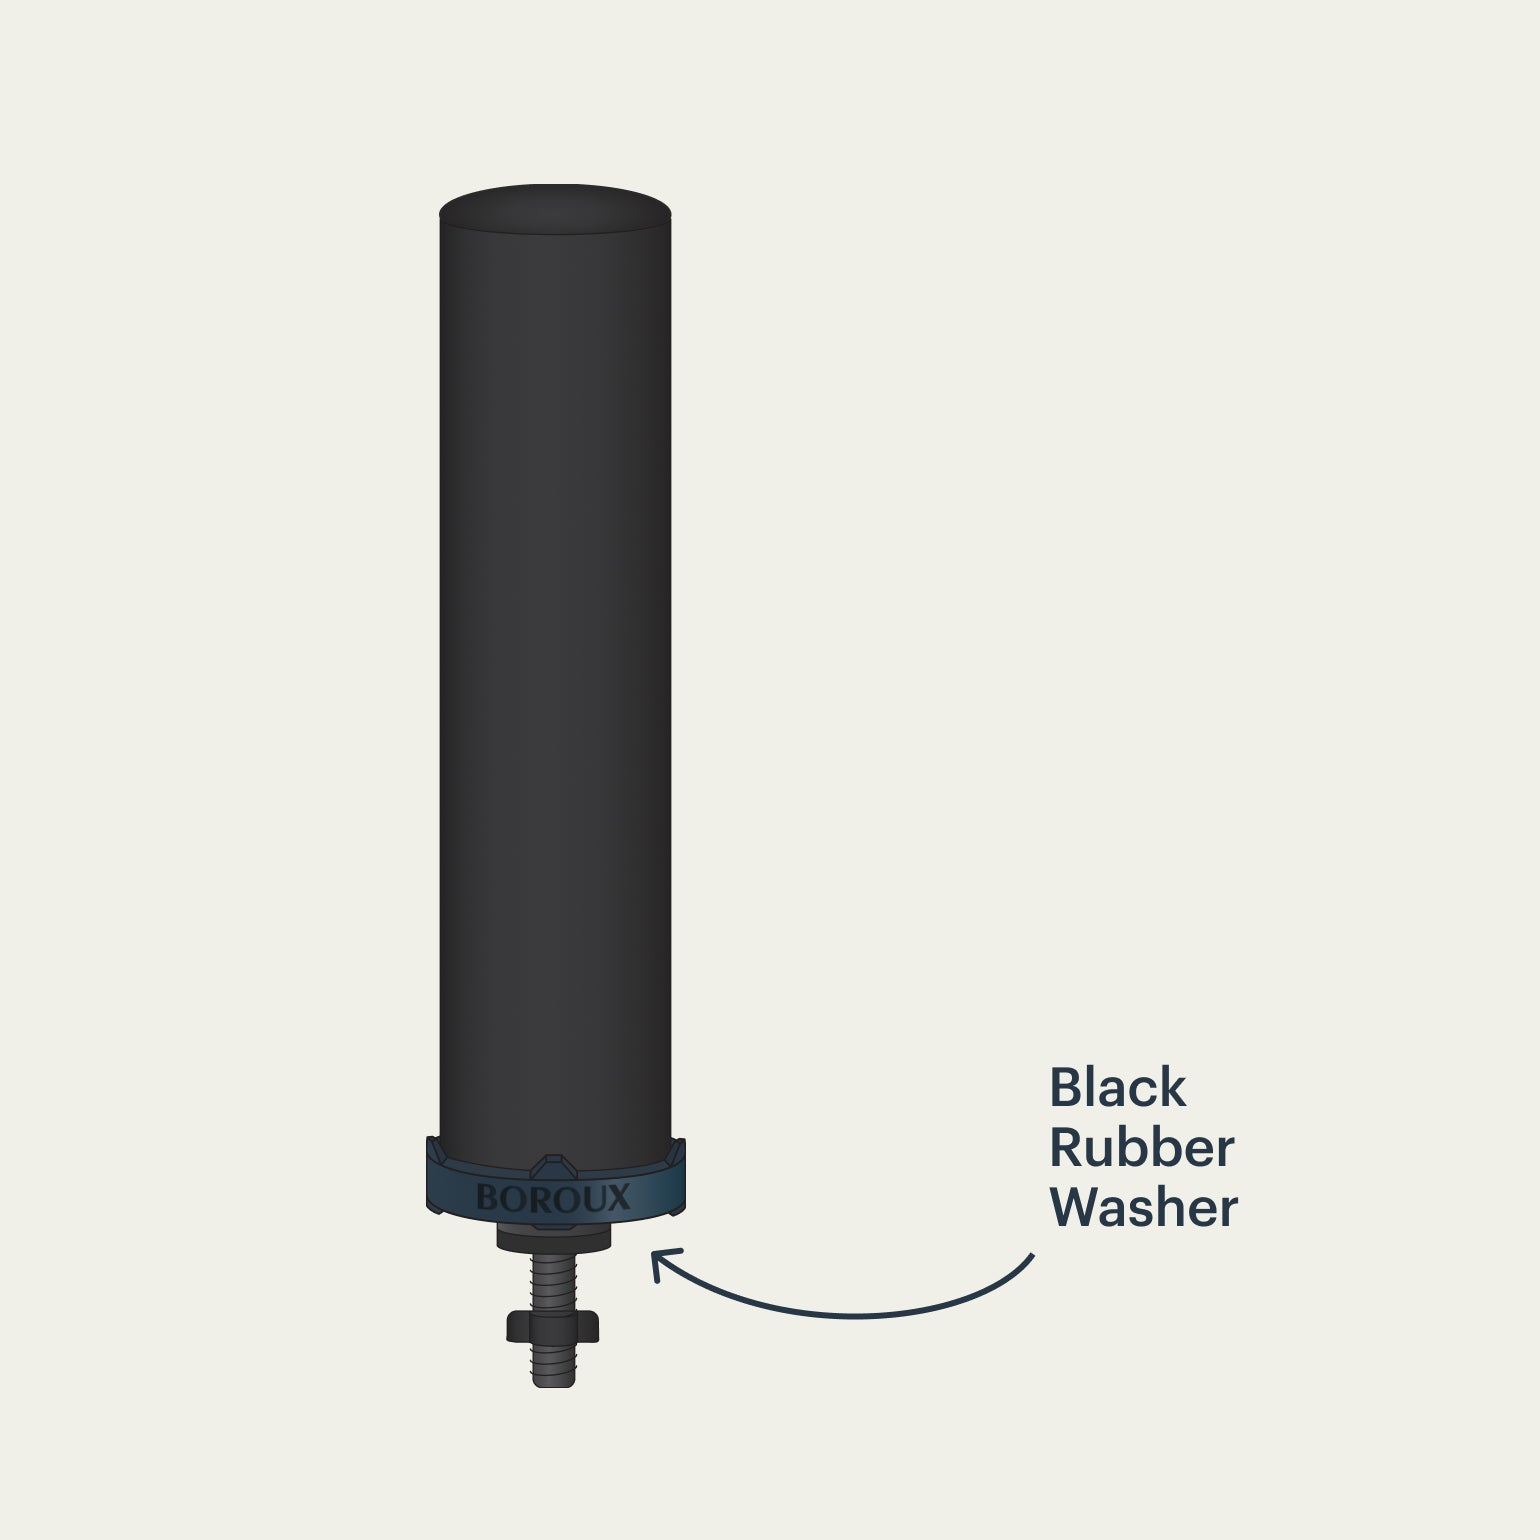
Remove the wingnut and washer from each Boroux filter.
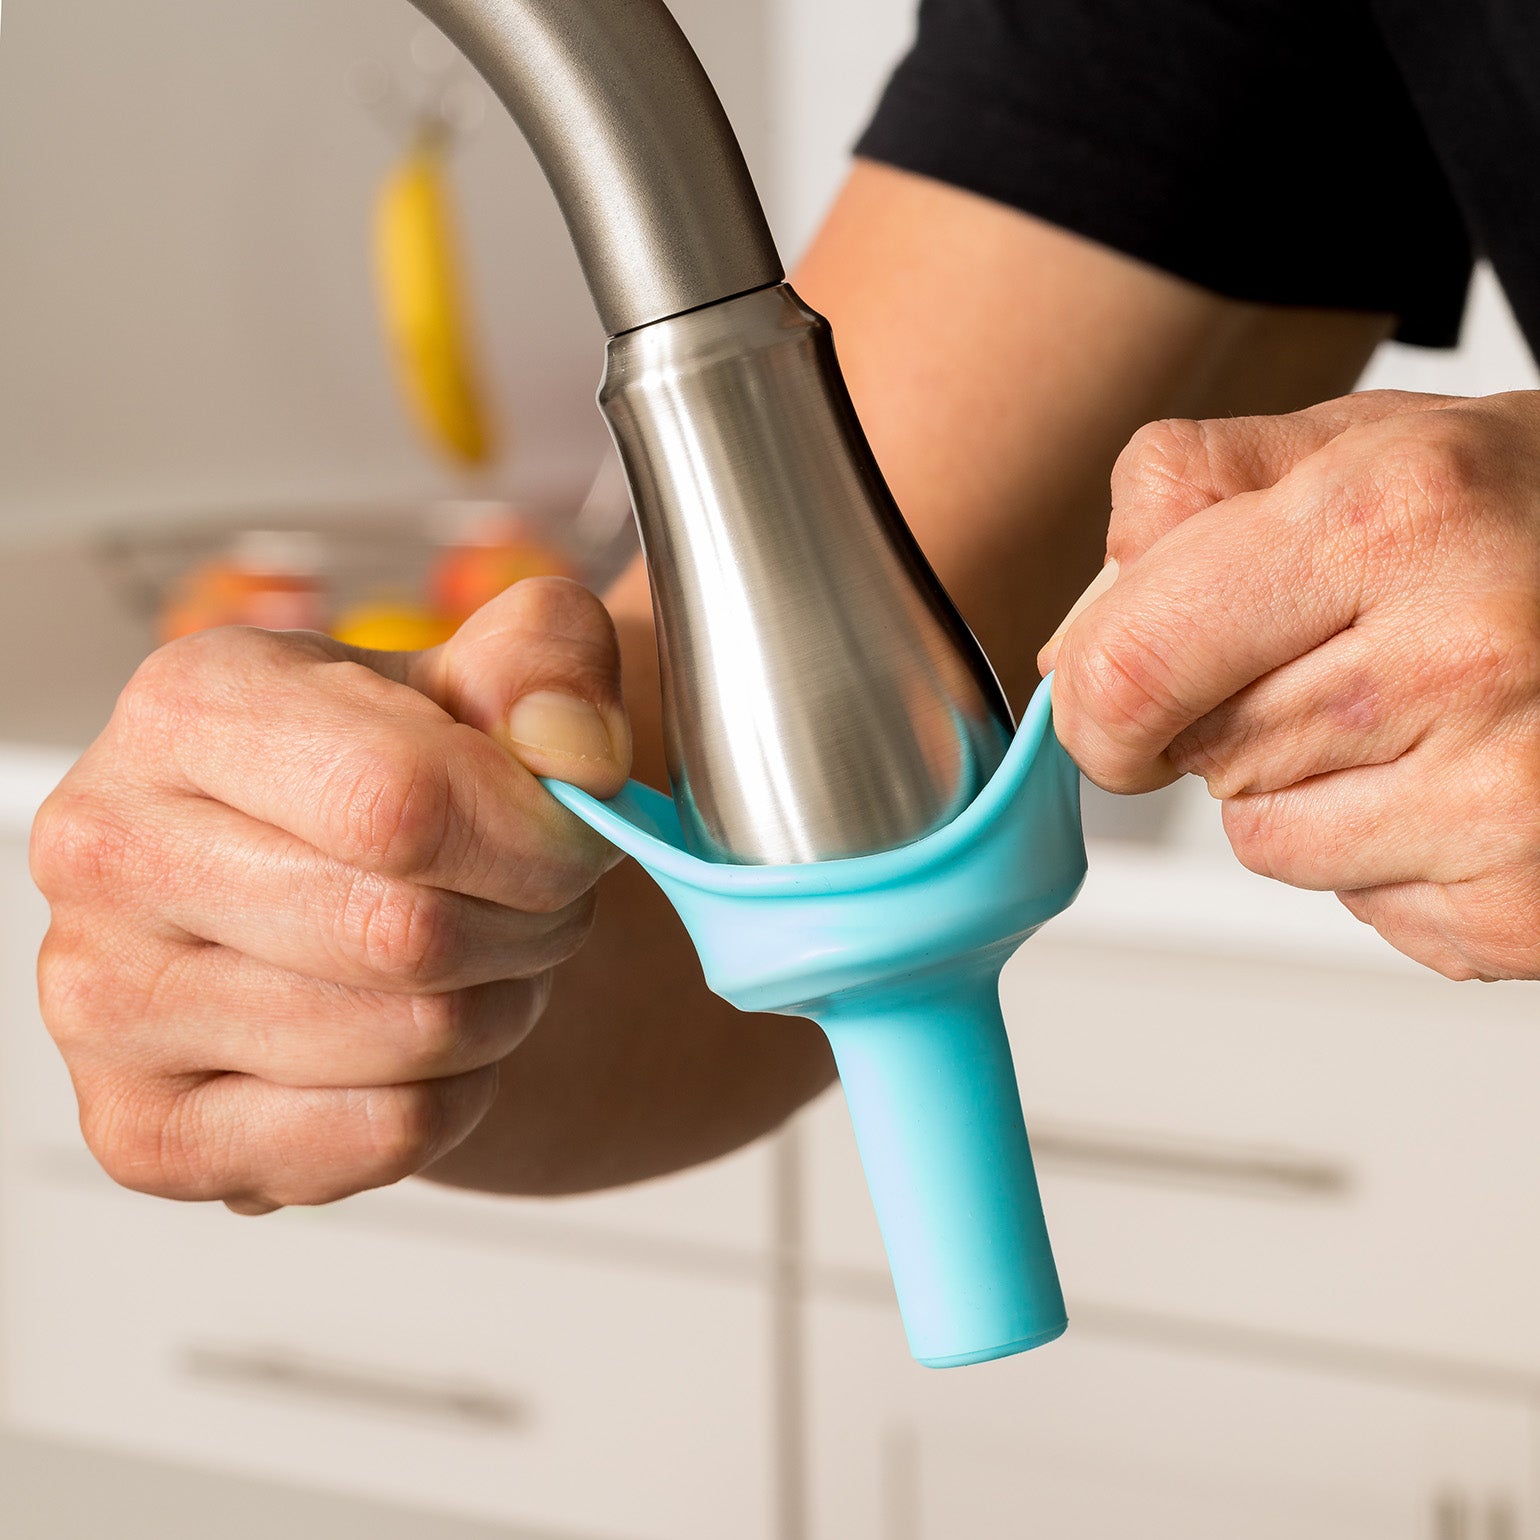
Step 2
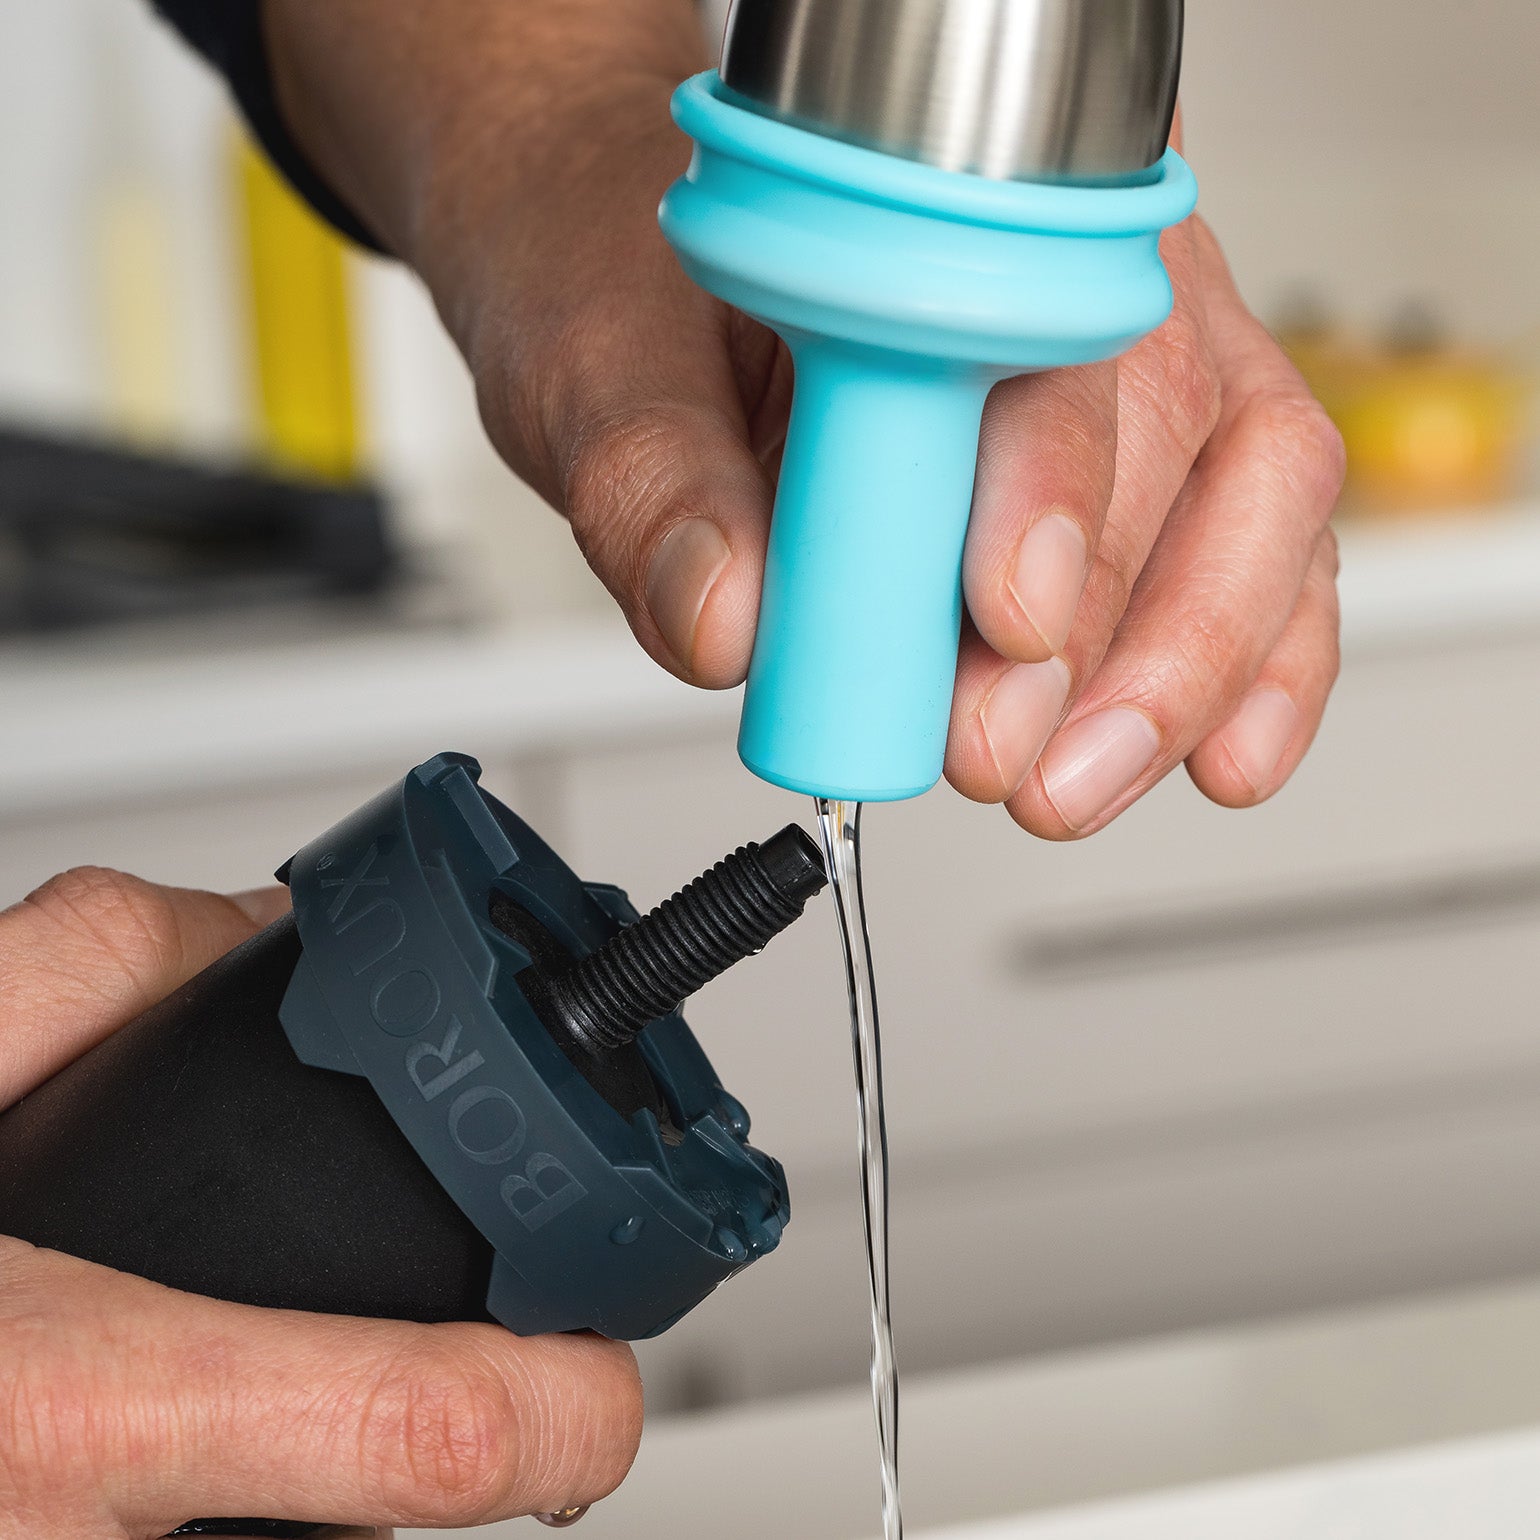
Attach the blue silicone primer to the faucet, making sure you pull the primer up as far as possible to create a good seal with the water spout.
Step 3
Adjust the water flow so that a 12 oz cup fills within 45 to 60 seconds. Important: Use only cold water.

Step 4
While the water is flowing, gently push the stem of the Boroux filter into the blue primer.
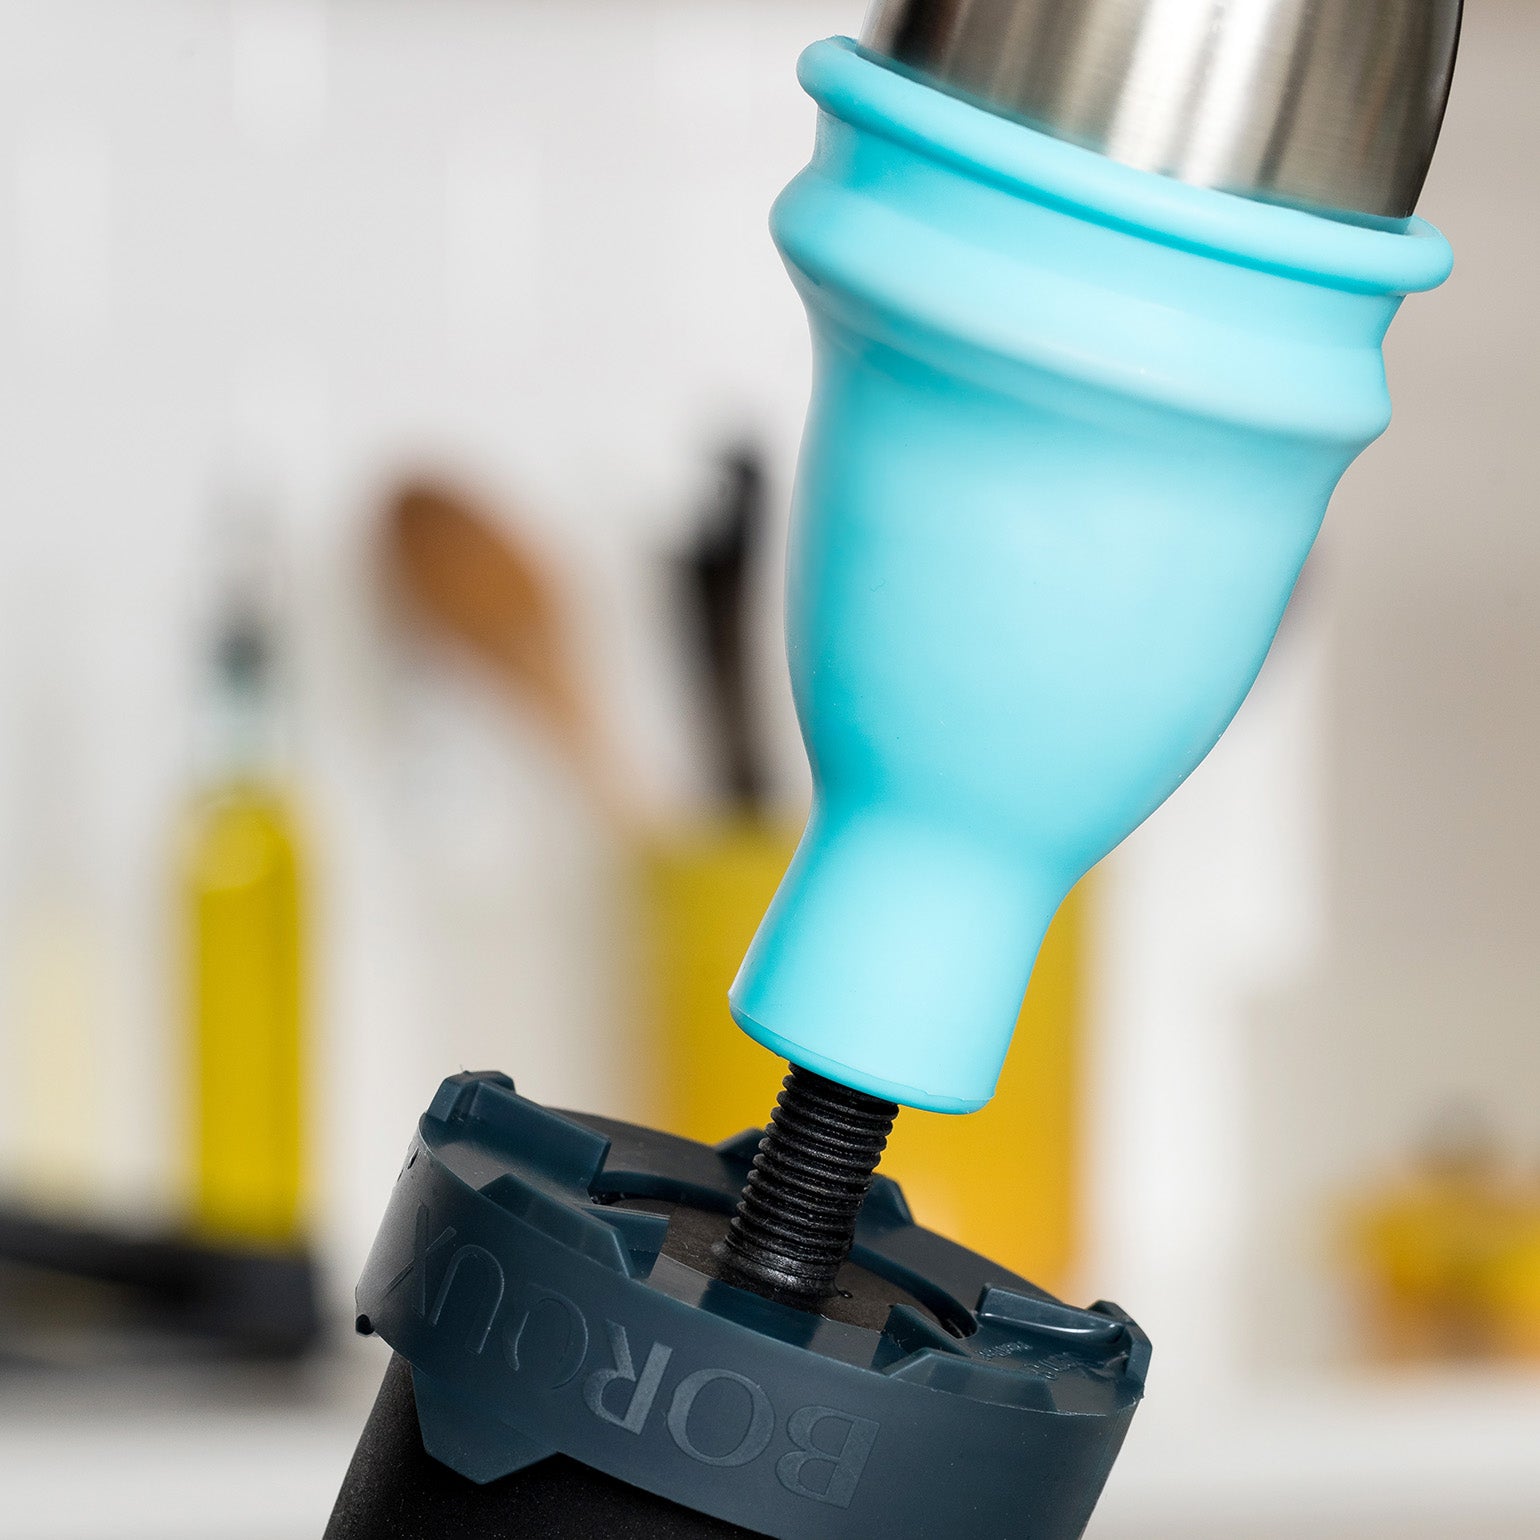
Step 5
If the blue primer inflates as shown above, or if there is excessive water leakage around the primer, re-adjust the water flow so that a 12 oz. cup fills within 45 to 60 seconds.
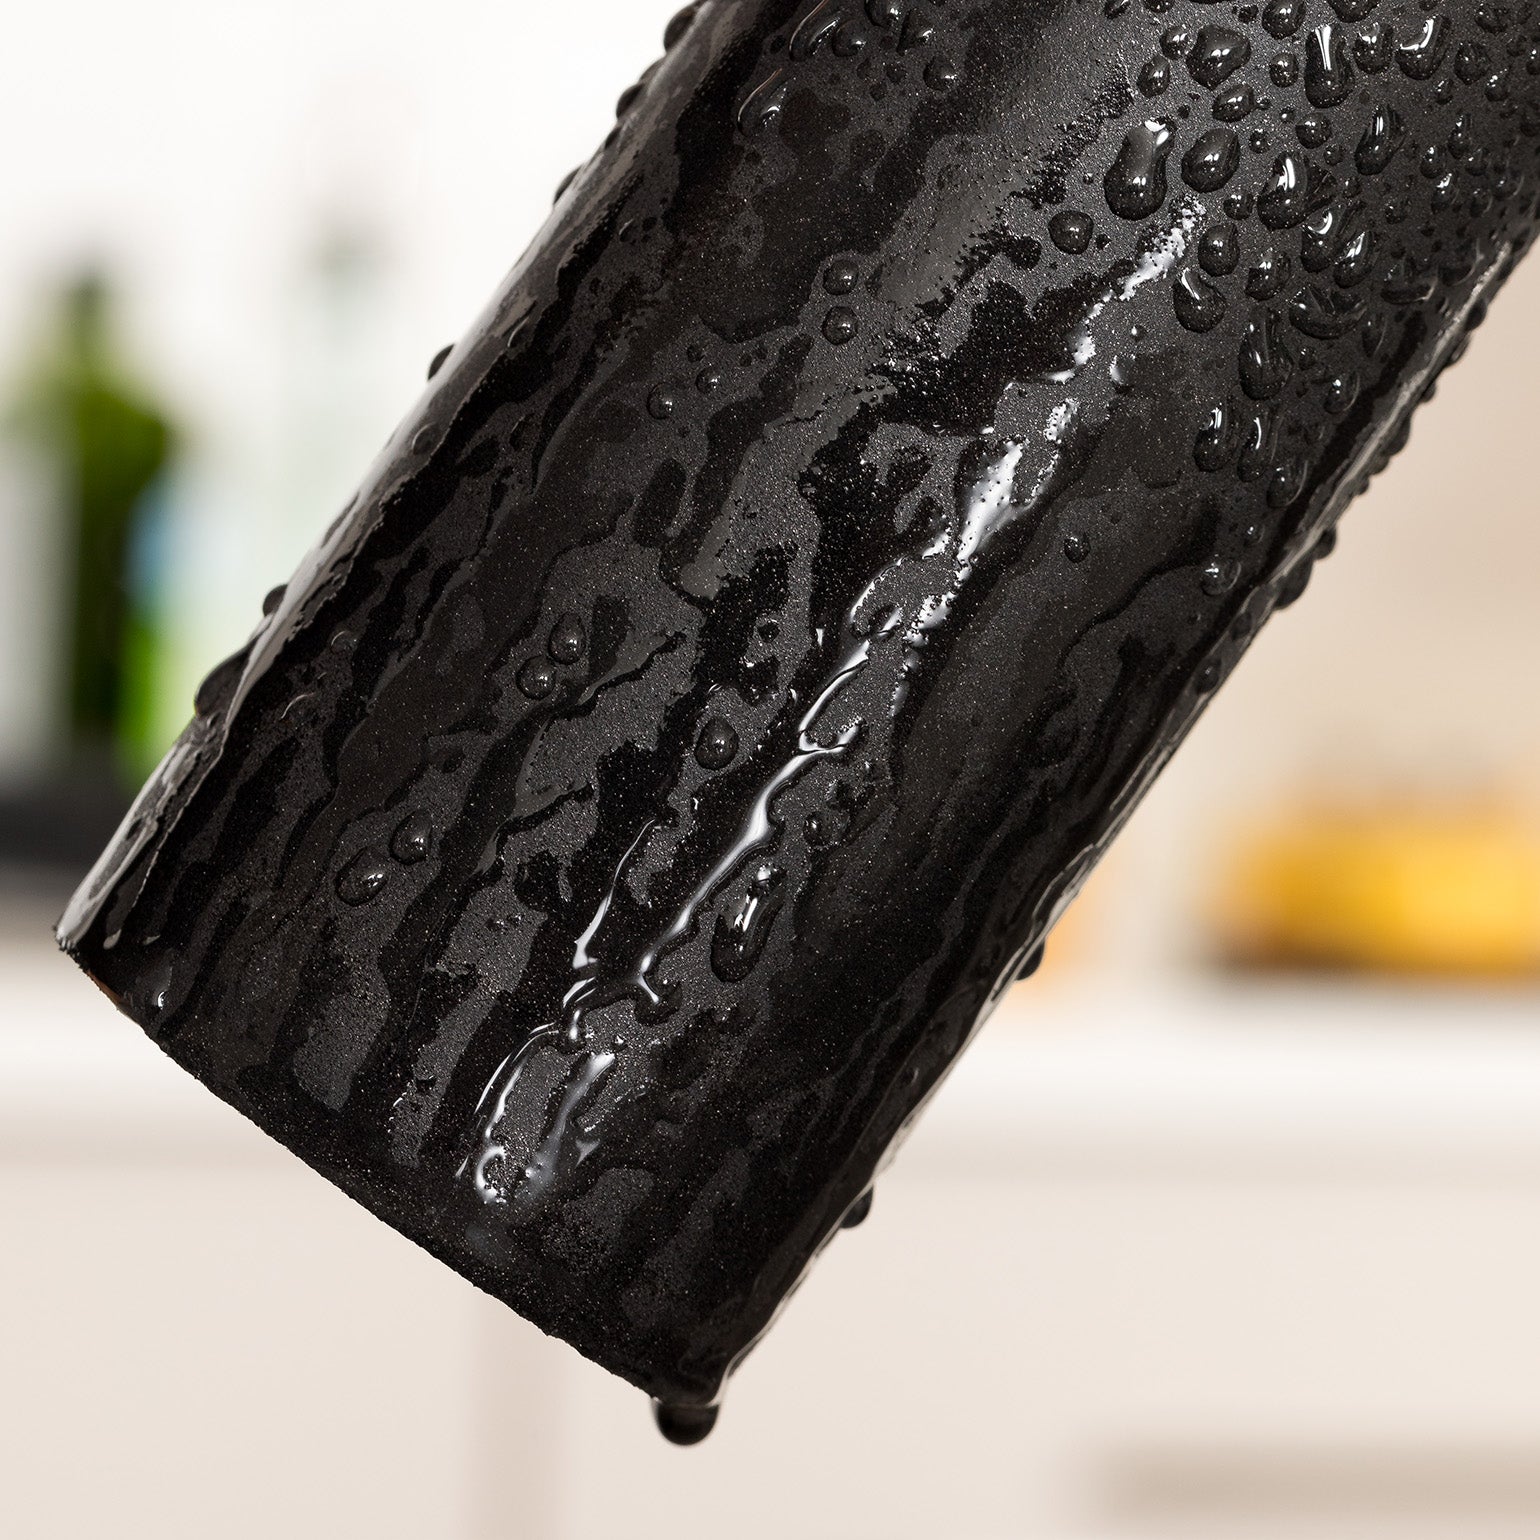
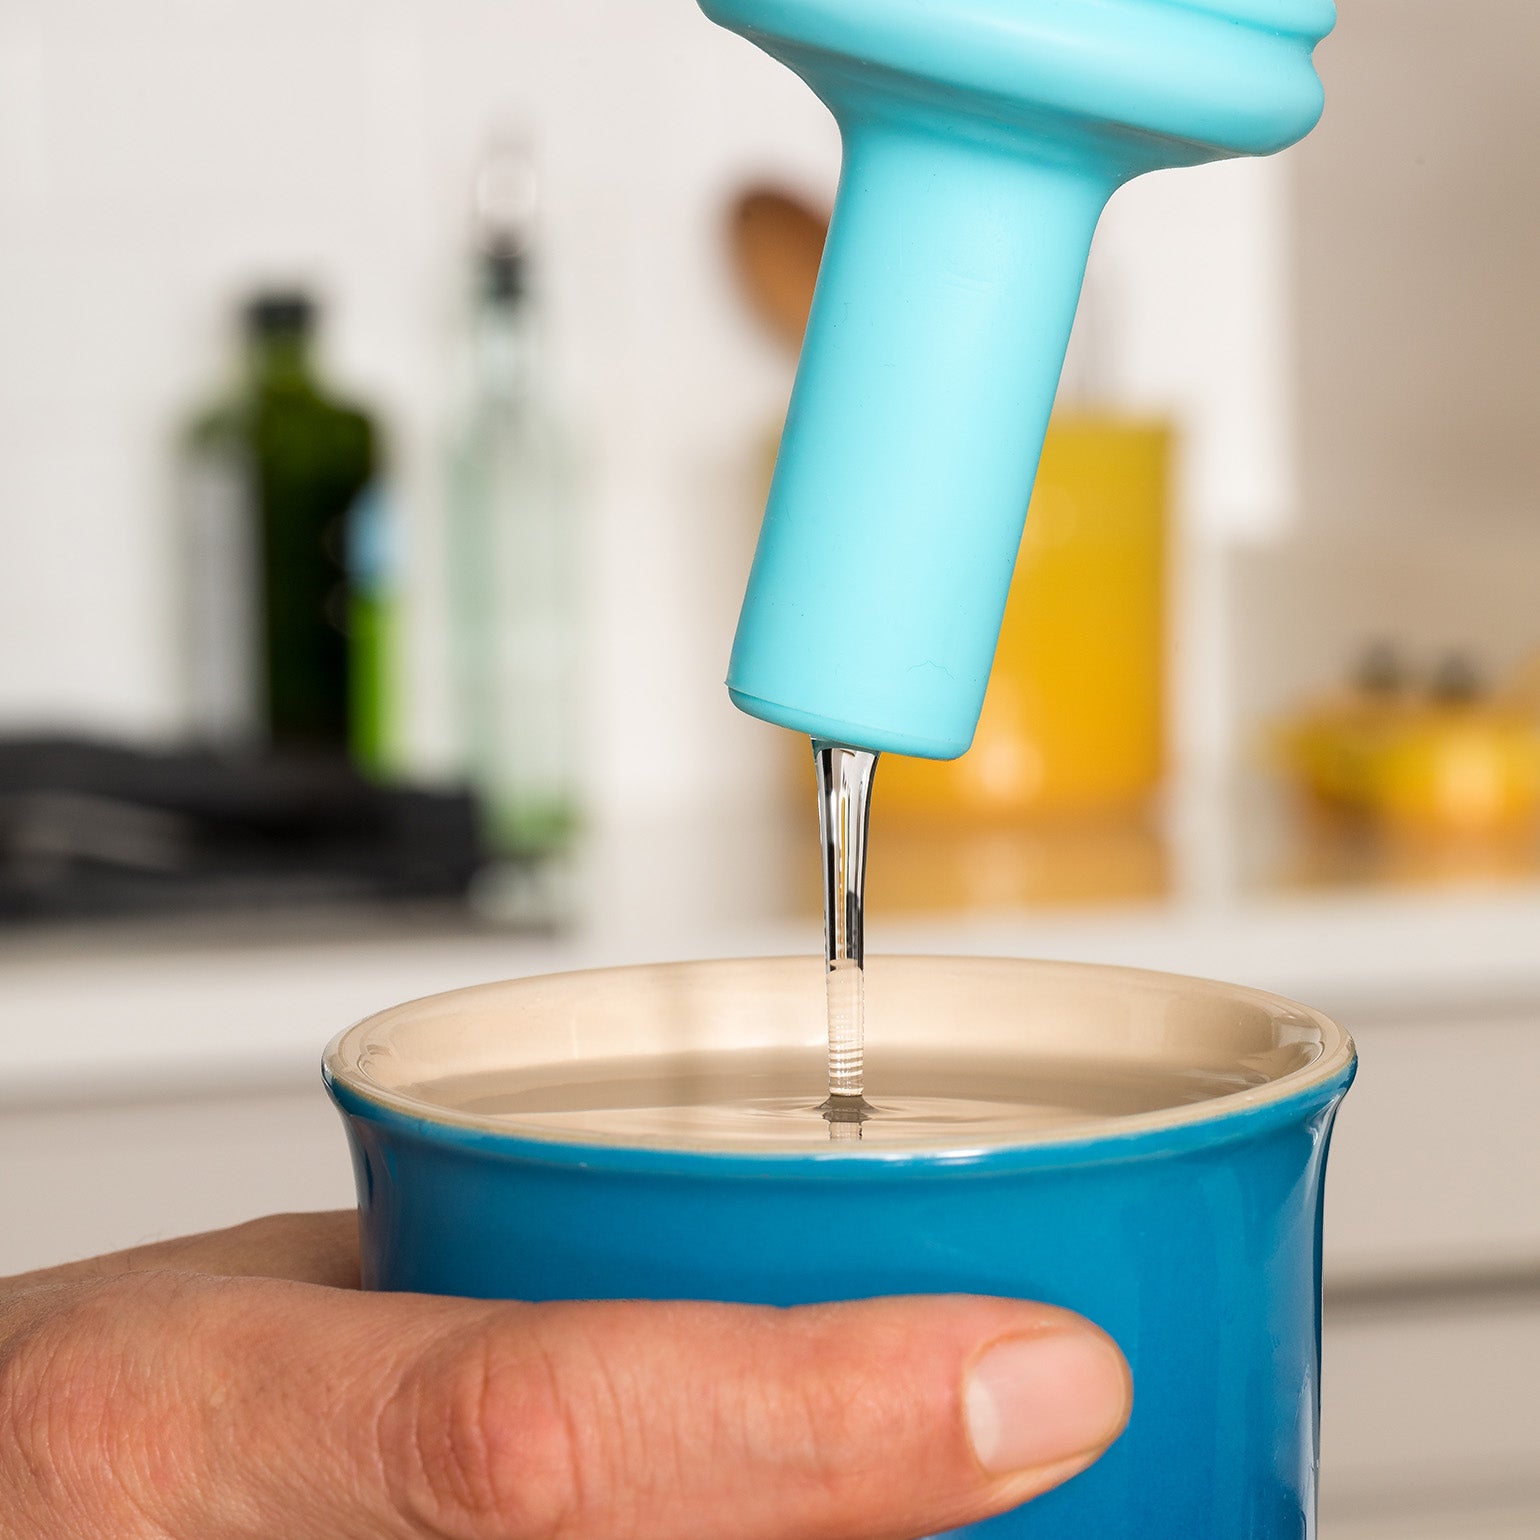
Step 6
After 1 to 2 minutes, water will be visible on the filter surface Continue to prime for 1 to 2 more minutes, until water beads on the entire filter surface.

Step 7
Keep water flow running. Remove the filter from the primer. Set the filter aside on a clean surface.
Step 8
Repeat the priming process for each Boroux filter (steps 4 through 7).
How to install filters into a system
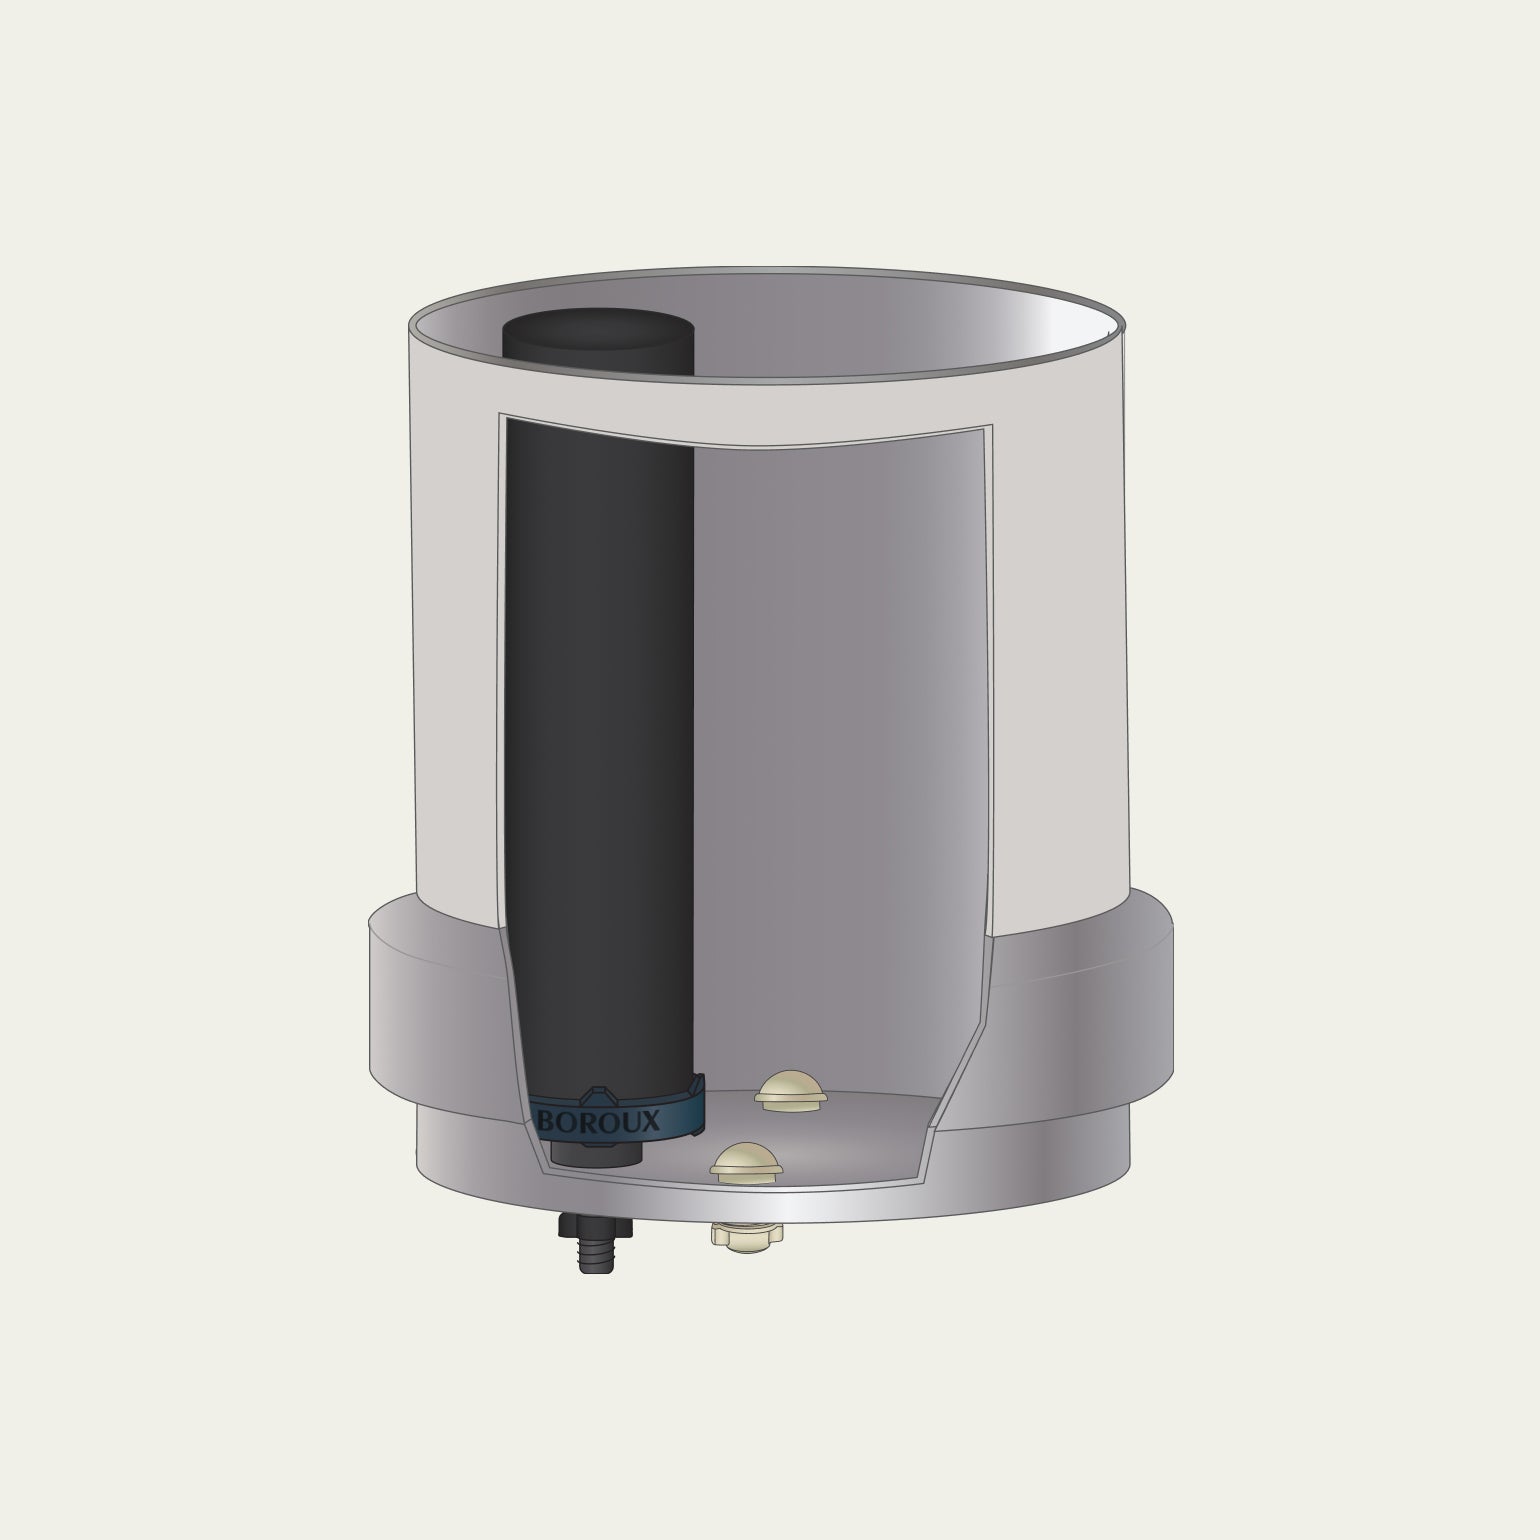
Boroux filters fit in most gravity-fed water filter systems. They are compatible if the stems fit into the holes and the chamber completely encapsulates the filters. Do not use tools. Repeat these steps for each filter.
Step 1
Thread the rubber washer onto the stem of each Boroux filter.
Step 2
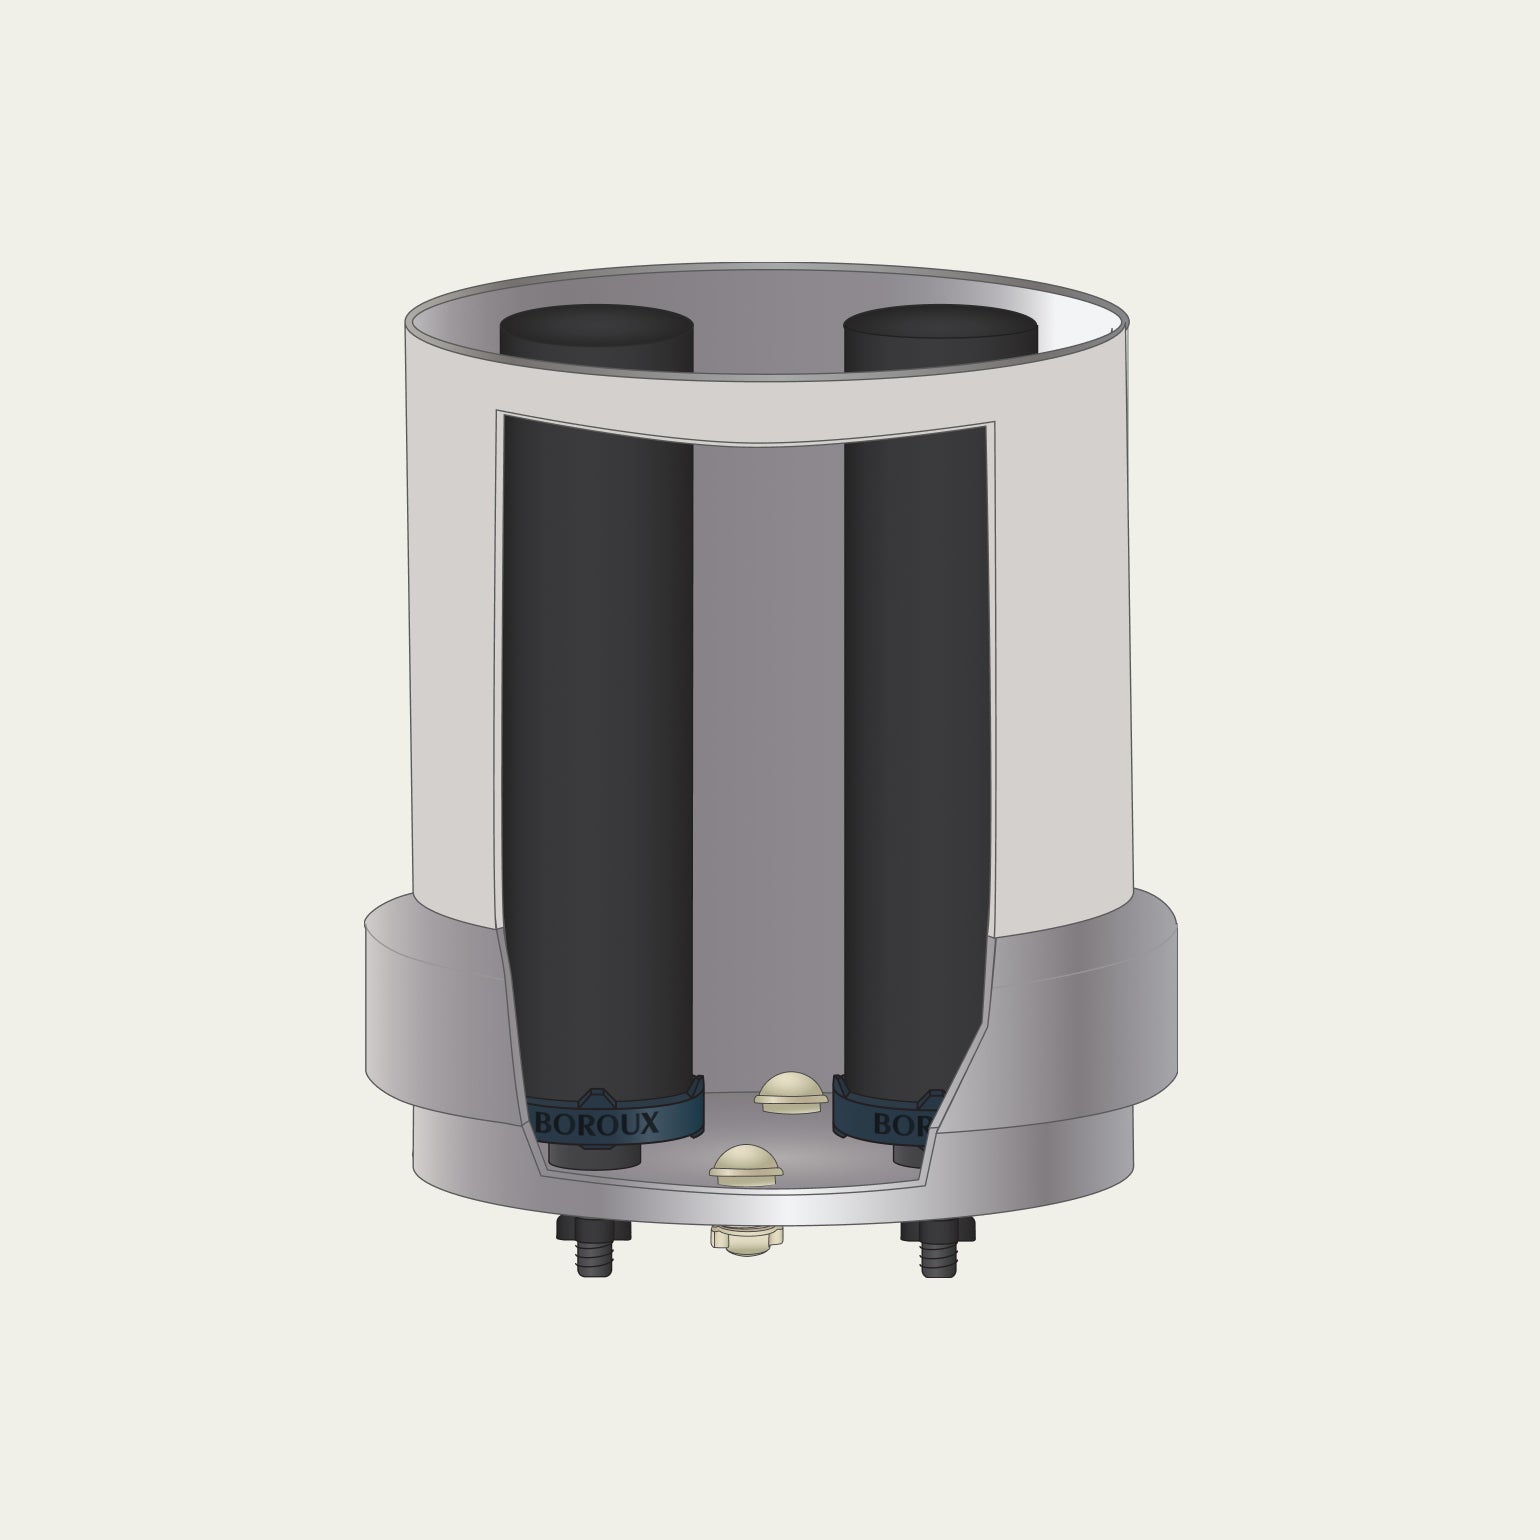
Insert the stem of the filter into an empty hole on the inside of the upper chamber. Repeat for each filter.
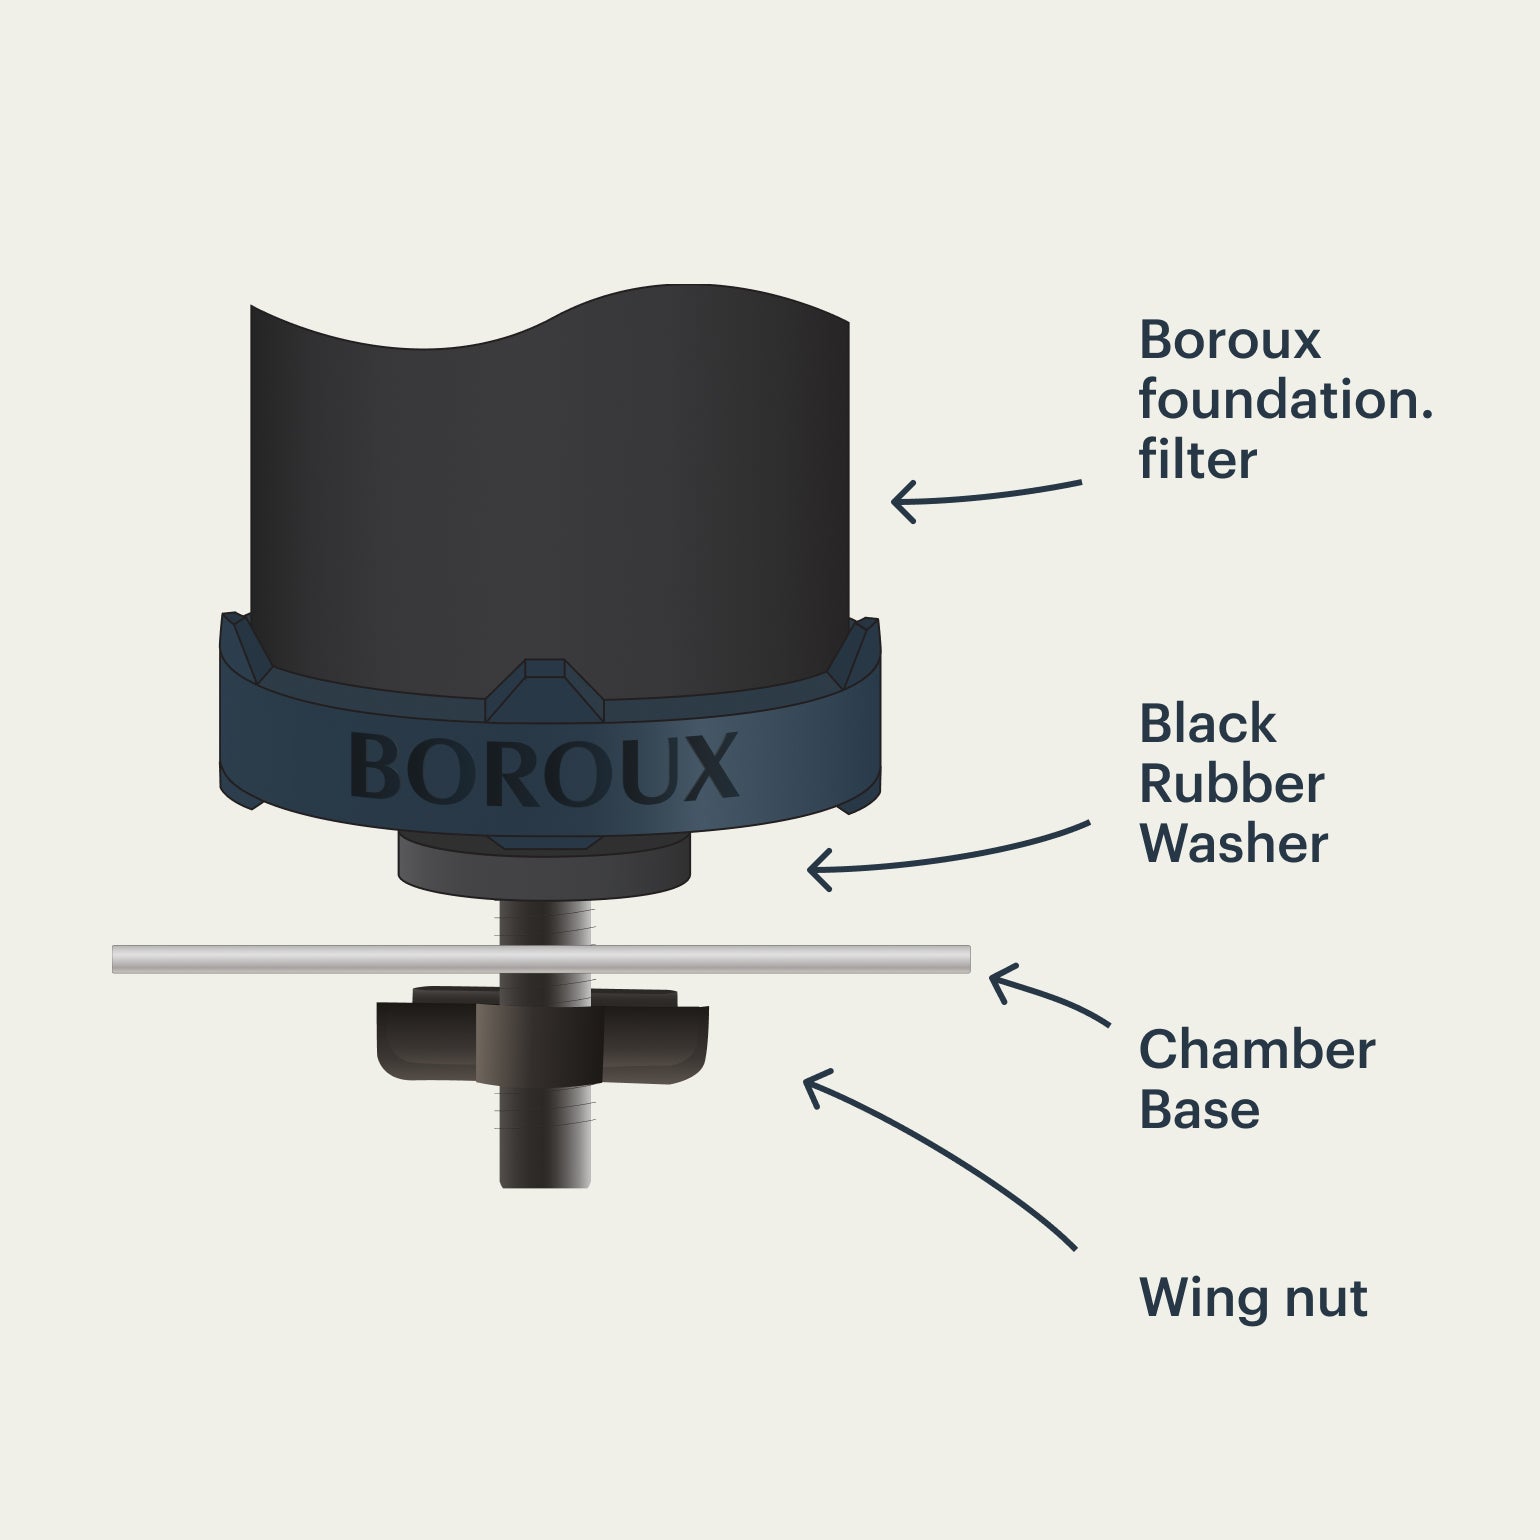
Step 3
On the outside of the chamber, thread the wingnut onto the filter stem and hand tighten until secure. Repeat for each filter. Important: Do not over-tighten.
Step 4
On the outside of the chamber, thread the wingnut onto the filter stem and hand tighten until secure. Repeat for each filter. Important: Do not over-tighten.
Perform the red dye test to verify correct installation
The red dye test serves as a diagnostic tool to determine whether the filters are installed properly. This procedure works by pouring red-dyed water through the filters to determine if any red-tinted water is visible after it goes through. Best practice is to perform this test upon receiving new filters and before use. If filters fail the test, we’re here to help!
Please use the red dye provided, or McCormick's artificial liquid red food coloring. Alternative dyes and gels, especially those labeled as natural, may contain minerals and natural colors that could bypass the filters, potentially yielding inaccurate results.
Before proceeding with the test, it is imperative to confirm that the washer and wingnut of the filters are correctly positioned. The washer should be located inside the upper chamber, while the wingnut should be fastened beneath the upper chamber.
Step 1
Important: If you installed fluoride filters, remove them before beginning a dye test. Set them aside on a clean surface. The lower water chamber should also be set aside on a clean surface.
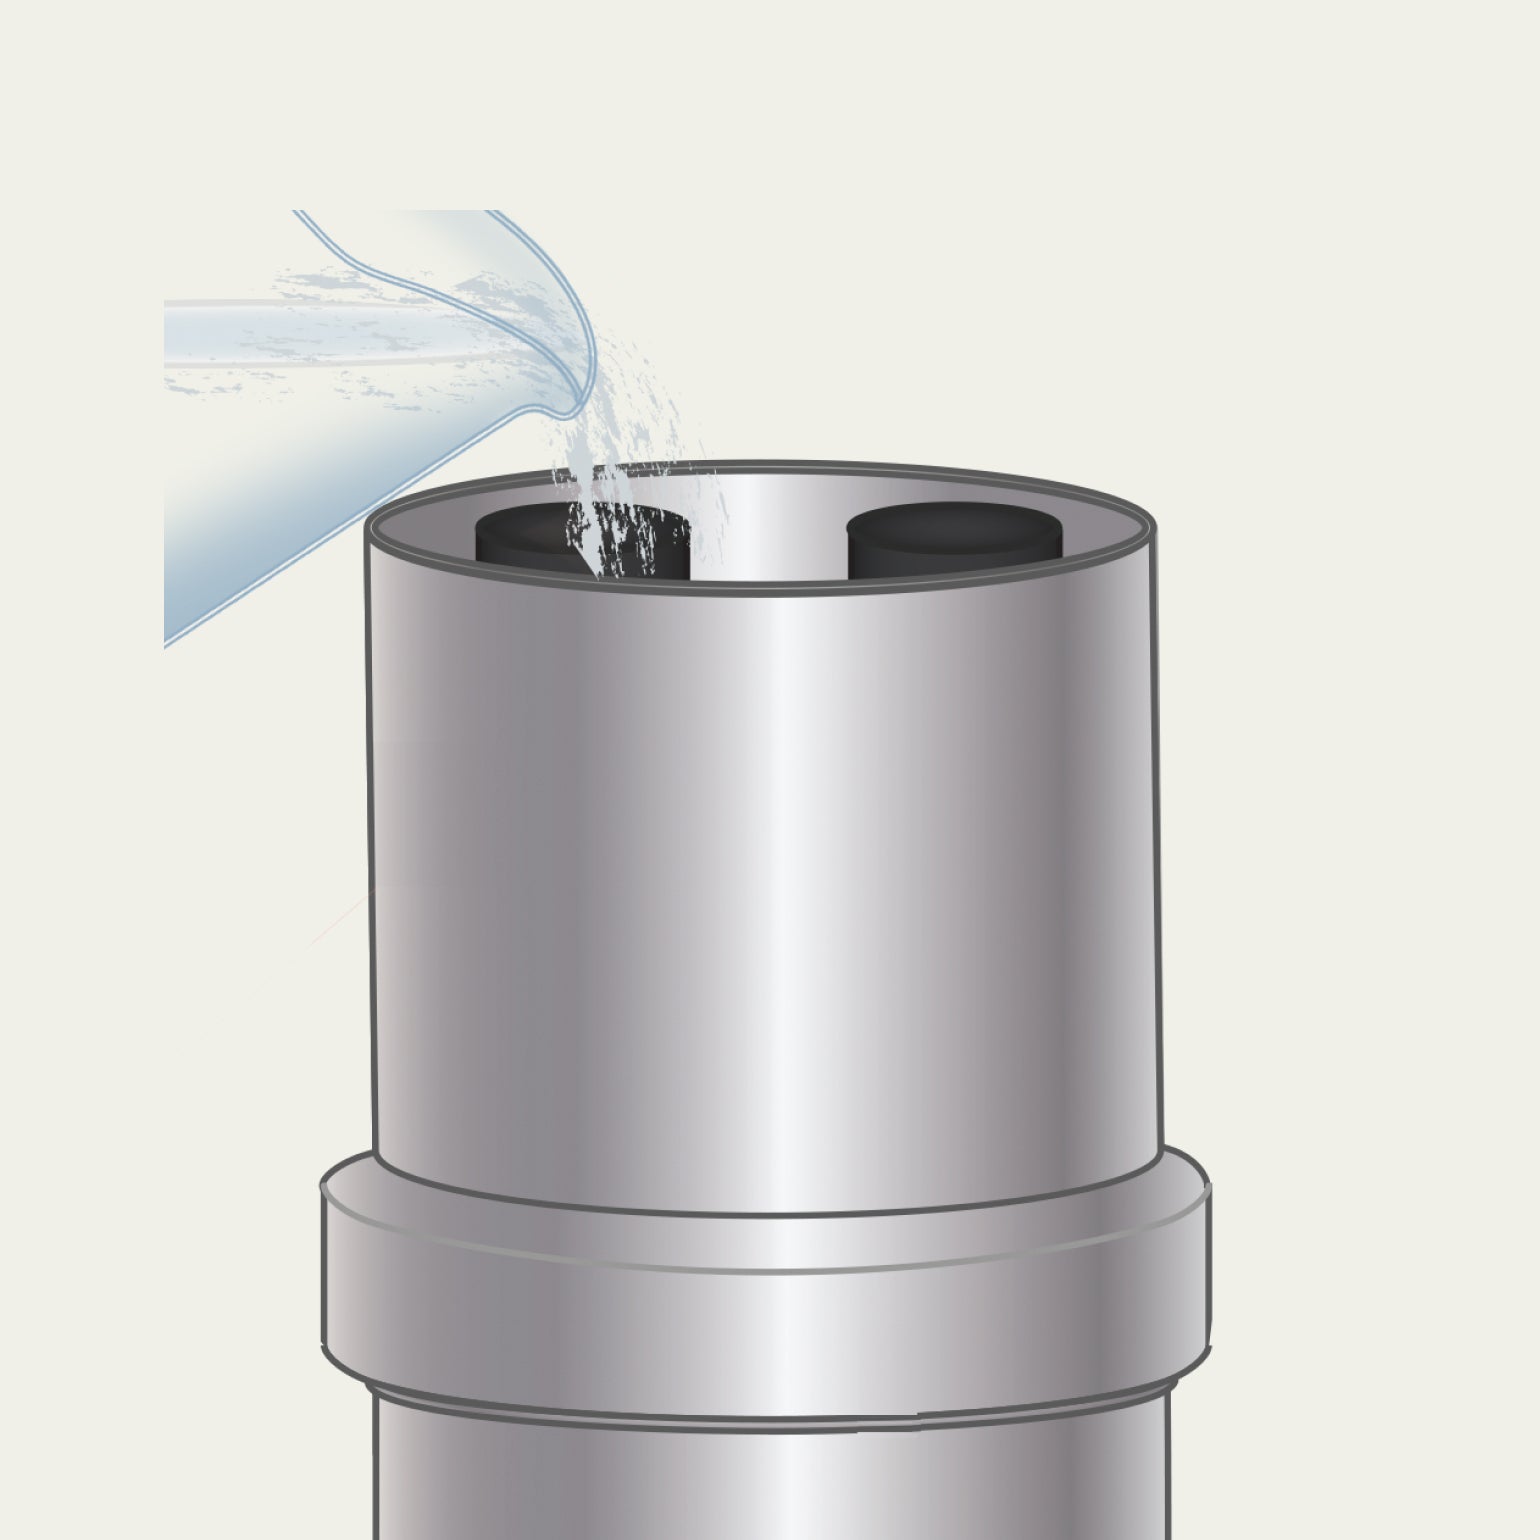
Fill the upper chamber with a few inches of water and check that water does not leak from any hole plug. Once you have verified there are no leaks, pour out the water from the upper chamber.

Step 2
Place a sturdy, equal-sized clear glass under each black filter stem. A pint-sized (16 oz) canning jar is ideal. Important: Each filter must have its own glass. Do not use a receptacle that covers both filter stems.

Step 3
In a separate container, add 1/8 of a teaspoon of dye per gallon of water. Mix thoroughly.
Note: Each vial of red food dye contains one teaspoon of dye. Most upper chamber sizes will require two gallons of the dye solution to test.
Step 4
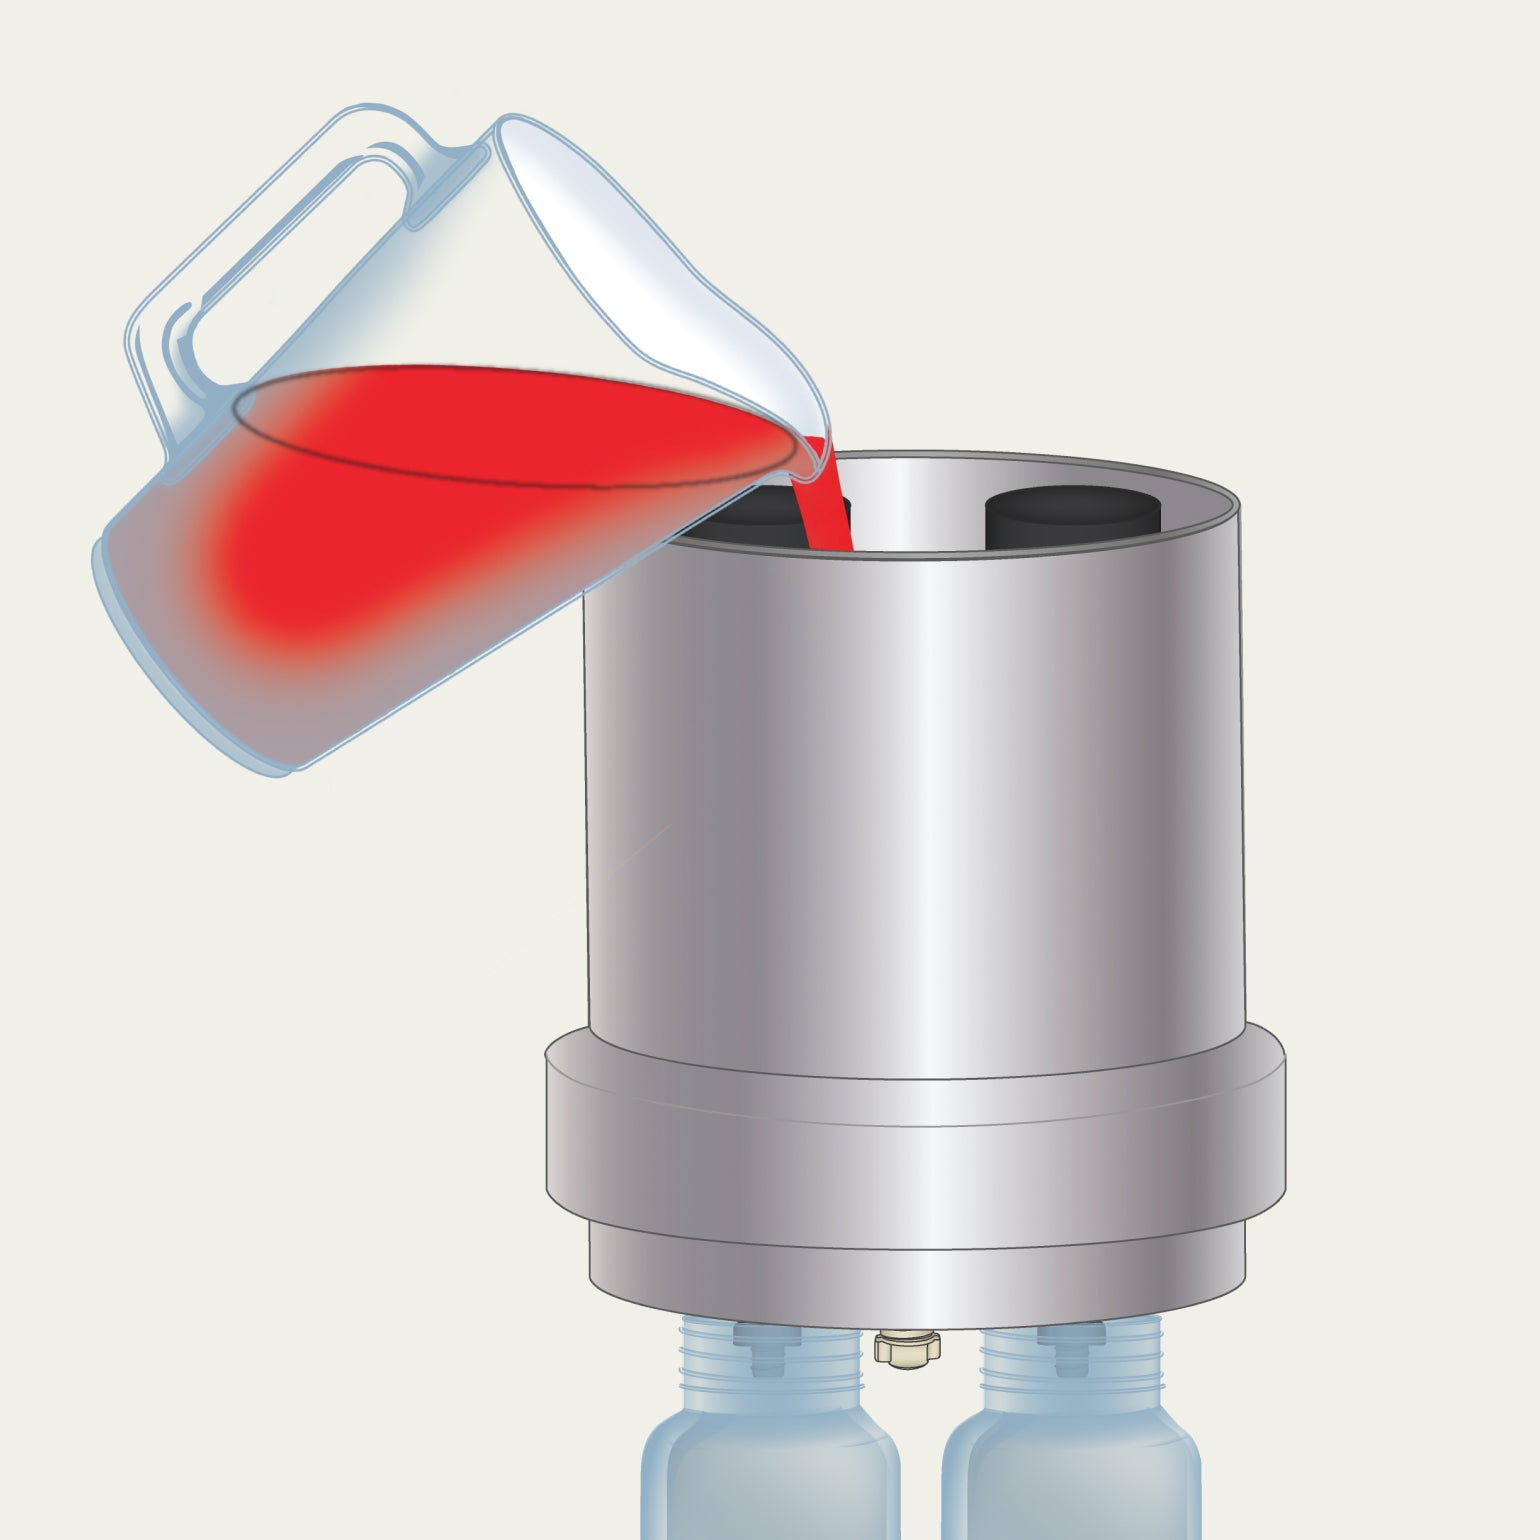
Pour the dye solution into the upper chamber until the Boroux filters are completely submerged.
Caution: Never pour red dye directly from the vial onto the filters or into the upper chamber.
Always pre-mix the dye with water in a separate container.
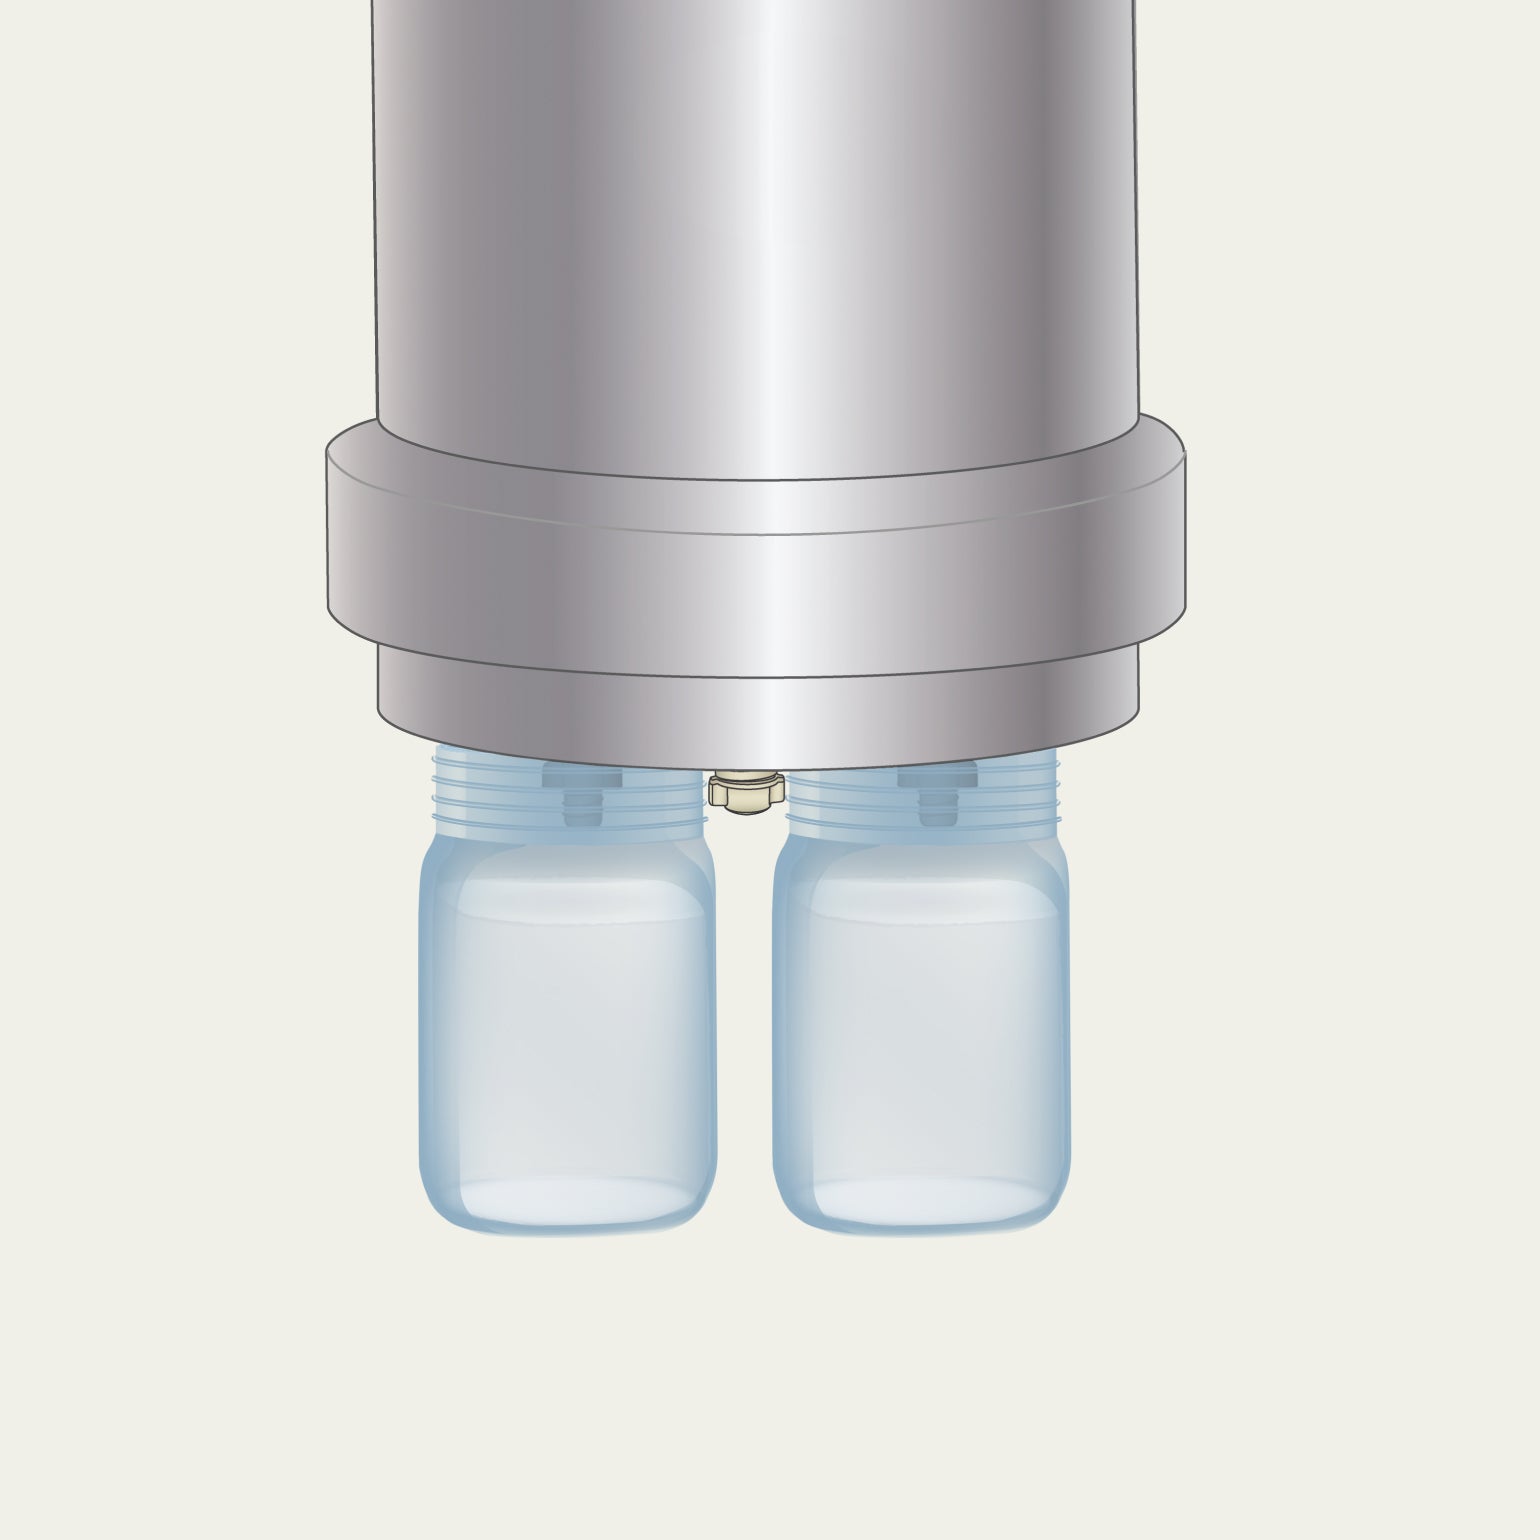
Step 5
Allow the water to filter from the upper chamber into the glasses below. When the glasses are 3/4 full, dump the remaining water out of the upper chamber.
Note: The glasses may fill at slightly different rates.

Step 6
Examine the water in each glass. It should be clear without any pink or red tint. If the water is not clear, make sure that the washer on that filter is in the correct location and that the wingnut is securely tightened. Repeat the red dye test.
Note: If a filter fails a second dye test, email contact@boroux.com.
Frequently Asked Questions
How to prime with the tan priming tool?
The complimentary tan priming button looks like a thick washer. It funnels water into the interior of the filter and forces water through the media to fully saturate it.
- Place the washer, wingnut, and tan priming button on the stem of the filter.
- Press the priming button up against the faucet. Hold the stem between two fingers, and use the wingnut for grip.
- Slowly turn on the water until it reaches a low but consistent flow, and be sure to use cold water.
- Let water run through the filter for approximately one minute. A good indicator that the filter is fully primed is if you can see small beads of water appearing on the sides of the filter.
- Turn off the water and remove the filter from the priming button. Your filter is now primed!
How to prime by soaking?
An alternative method is to soak the filters overnight. It’s ideal for situations when water pressure is not adequate, or if the priming tools don't fit with your faucet. This method is not recommended after cleaning the filters because water pressure is needed to flush out particles. This method saturates the filter media from the outside in, drawing water from the exterior through the pores to the inside.
- Place the filters with the stems up in a large enough container to fully cover the filters with water.
- Fill the container with water.
- Soak overnight, or for at least eight hours.
- To determine if the filters are fully primed; if filters float, they need to be soaked longer, if they sink, they are primed.
Why do the filters have to be primed?
Priming the Boroux filters is necessary for proper function. This procedure is what activates the carbon and breaks the surface tension, so that the contaminants get trapped, and the water gets through. The filter is made of very dense material and priming forces water through the material so that it’s entirely saturated. This is a crucial initial step for using the filters.
The media that the Boroux filter is made of has a micropore structure. These micropores are miniscule which can create tiny pockets of air. Along with the high surface tension of the filter material, without being primed first, water cannot pass through those air bubbles. Priming uses water pressure to force water through those micropores so that when water is passing through only using gravity, it can. If the filters are not primed, the flow can be extremely slow, if not completely nonexistent.
What if I don’t see beads of water on my filter when priming?
Each filter is unique, some filters shows lots of water beads, others do not. As long as the filter is fully saturated, they are primed. Running water through the filter for 1-2 minutes fully saturates the filter.
What happens if the filters fail the red dye test?
For a failed red dye test, double check these variables:
- Do not pour dye directly onto the filters, it will overwhelm them.
- Use the correct type of dye. It must be red, artificial liquid. Natural dyes contain minerals that pass through the filters. Gel food coloring should NOT be used because it is too viscous, it won’t result in accurate results.
- Confirm a tight seal between the base of the filter and the upper chamber so that the only water getting through is going through the filter, not leaking through the hole. The washer should be on the stem of the black filter inside the upper chamber, and the wingnut should be secured on the filter stem on the underside of the upper chamber. Wingnuts should only be hand tightened. Do not use tools to tighten. If the wingnuts are too tight the stem threads could be damaged.
- If re-testing a filter; rinse the filter, rinse the glasses or jars, prime the filters again, and then redo the test.


Phone Support
Questions? Leave a voicemail or request a callback.
1-800-350-4170
